参考
https://grpc.io/docs/quickstart/go/
https://blog.lelonek.me/a-brief-introduction-to-grpc-in-go-e66e596fe244

// 转换为snake
package main

import (
    "fmt"
    "regexp"
    "strings"
)

var matchAllCap = regexp.MustCompile("([a-z0-9])([A-Z])")

func ToSnakeCase(str string) string {
    snake := matchAllCap.ReplaceAllString(str, "${1}_${2}")
    fmt.Println(snake)
    return strings.ToLower(snake)
}

func main() {
    fmt.Println(ToSnakeCase("JapanCanadaAustraliaHelloWorld"))
}
// 转换为驼峰
package main

import (
    "fmt"
    "strings"
)

func ToCamelCase(str string) string {
    temp := strings.Split(str, "-")
    for i, r := range temp {
        if i > 0 {
            temp[i] = strings.Title(r)
        }
    }

    return strings.Join(temp, "")
}

func main() {
    str := "the-stealth-warrior"
    fmt.Println(ToCamelCase(str))
}
// 转驼峰 优化版
package main

import (
    "fmt"
    "regexp"
    "strings"
)

var re = regexp.MustCompile("(_|-)([a-zA-Z]+)")

func ToCamelCase(str string) string {
    camel := re.ReplaceAllString(str, " $2")
    camel = strings.Title(camel)
    camel = strings.Replace(camel, " ", "", -1)

    return camel
}

func main() {
    str := "the_start_boy"
    fmt.Println(ToCamelCase(str))
}
废了一番功夫,终于搞定了Golang与MySQL的日期格式化问题,实在是费劲啊,特此记录一下。
话不多说,上代码
package main

import (
    "database/sql"
    "encoding/json"
    "fmt"
    "log"
    "net/http"
    "time"

    _ "github.com/go-sql-driver/mysql"
    "github.com/gorilla/mux"
)

// Article - Our struct for all articles
type Article struct {
    Id        int    `json:"id"`
    Title     string `json:"title"`
    Content   string `json:"content"`
    CreatedAt string `json:"created_at"`
}

type Articles []Article

func homePage(w http.ResponseWriter, r *http.Request) {
    fmt.Fprintf(w, "Welcome to the HomePage!")
    fmt.Println("Endpoint Hit: homepage")
}

// get articles list
func list(w http.ResponseWriter, r *http.Request) {
    db, err := sql.Open("mysql", "root:@tcp(127.0.0.1:3306)/golang")
    if err != nil {
        panic(err.Error())
    }
    defer db.Close()

    result, err := db.Query("SELECT id, title, content FROM articles")
    if err != nil {
        panic(err.Error())
    }

    article := Article{}
    articles := []Article{}

    for result.Next() {
        var id int
        var title, content string
        err = result.Scan(&id, &title, &content)
        if err != nil {
            panic(err.Error())
        }

        article.Id = id
        article.Title = title
        article.Content = content

        articles = append(articles, article)
    }

    json.NewEncoder(w).Encode(articles)
}

// get one artcle
func show(w http.ResponseWriter, r *http.Request) {
    vars := mux.Vars(r)
    request_id := vars["id"]

    // 这里连接mysql的参数设置Ioc和parseTime很关键
    db, err := sql.Open("mysql", "root:@tcp(127.0.0.1:3306)/golang?charset=utf8&loc=Asia%2FShanghai&parseTime=true")
    if err != nil {
        panic(err.Error())
    }
    defer db.Close()

    var id int
    var title, content string
    var createdAt string
    article := Article{}
    err = db.QueryRow("select id, title, content, created_at from articles where id = ?", request_id).Scan(&id, &title, &content, &createdAt)
    if err != nil {
        if err == sql.ErrNoRows {
            errData := map[string]string{"errcode": "ER404", "errmsg": "not found"}
            json.NewEncoder(w).Encode(errData)
            return
        }
    }

    // 这里处理日期格式化问题
    t1, _ := time.Parse(time.RFC3339, createdAt)
    createdAt = t1.Format("2006-01-02 15:04:05")

    article.Id = id
    article.Title = title
    article.Content = content
    article.CreatedAt = createdAt
    json.NewEncoder(w).Encode(article)
}

func handleRequests() {
    myRouter := mux.NewRouter().StrictSlash(true)
    myRouter.HandleFunc("/", homePage)
    myRouter.HandleFunc("/articles", list)
    myRouter.HandleFunc("/articles/{id}", show)
    log.Fatal(http.ListenAndServe(":10000", myRouter))
}

func main() {
    handleRequests()
}
这里有几点需要注意的事项
以下两图揭示了关键的两点

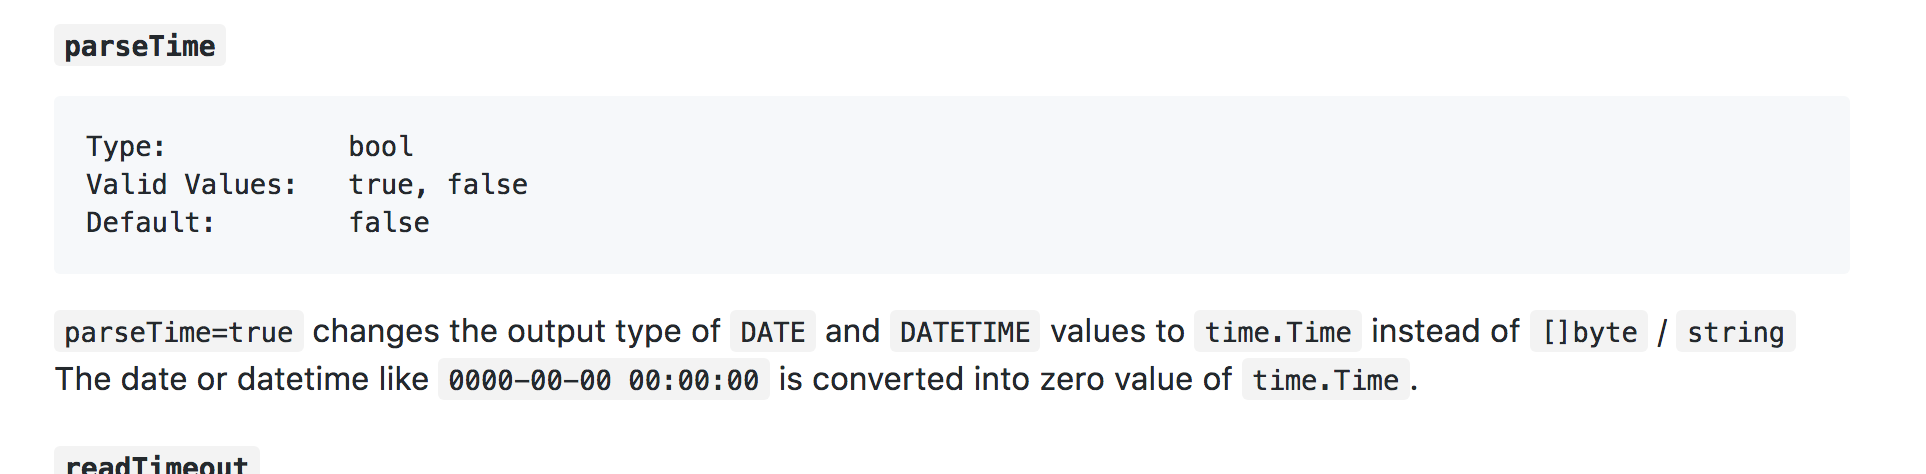
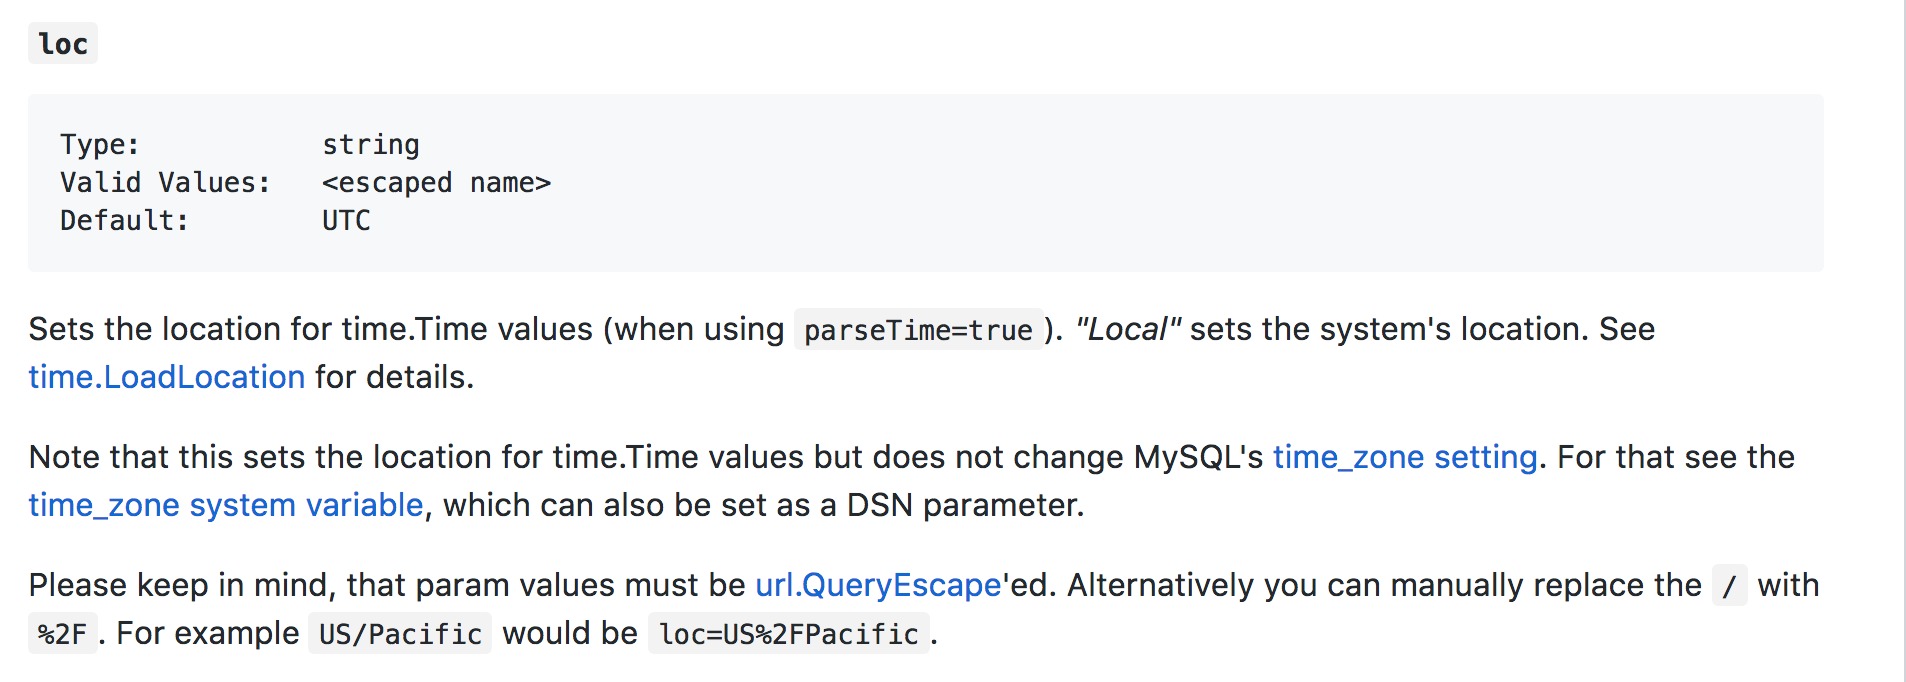
https://github.com/go-sql-driver/mysql#timetime-support
https://github.com/jinzhu/gorm/issues/1047
https://github.com/jinzhu/gorm/issues/18
https://programming.guide/go/format-parse-string-time-date-example.html
https://yourbasic.org/golang/format-parse-string-time-date-example/
最近开始学习golang开发,一直以来从事PHP开发,接触了golang后便被她深深的吸引了。
gofmt带来了代码一致性,解决了困扰开发多年的代码风格不统一的问题,这是给人的最直观感受。
语法的简洁性,以及自定义类型的灵活性。语言本身只定义了基本数据类型结构,例如int, string, array, slice, map,其他可由struct来自行实现。
goroutine带来的飞跃性好处,是其他语言所没有或没那么容易实现的。它可由以前串行执行的方法改为并行执行,想想都叫人愉快 ^_^, 充分利用了机器的多核性能。
编译型语言带来的好处不言而喻,以及跨平台特性。真正实现了Build Once, Run anywhere。
方便的文档以及可分享的playground。
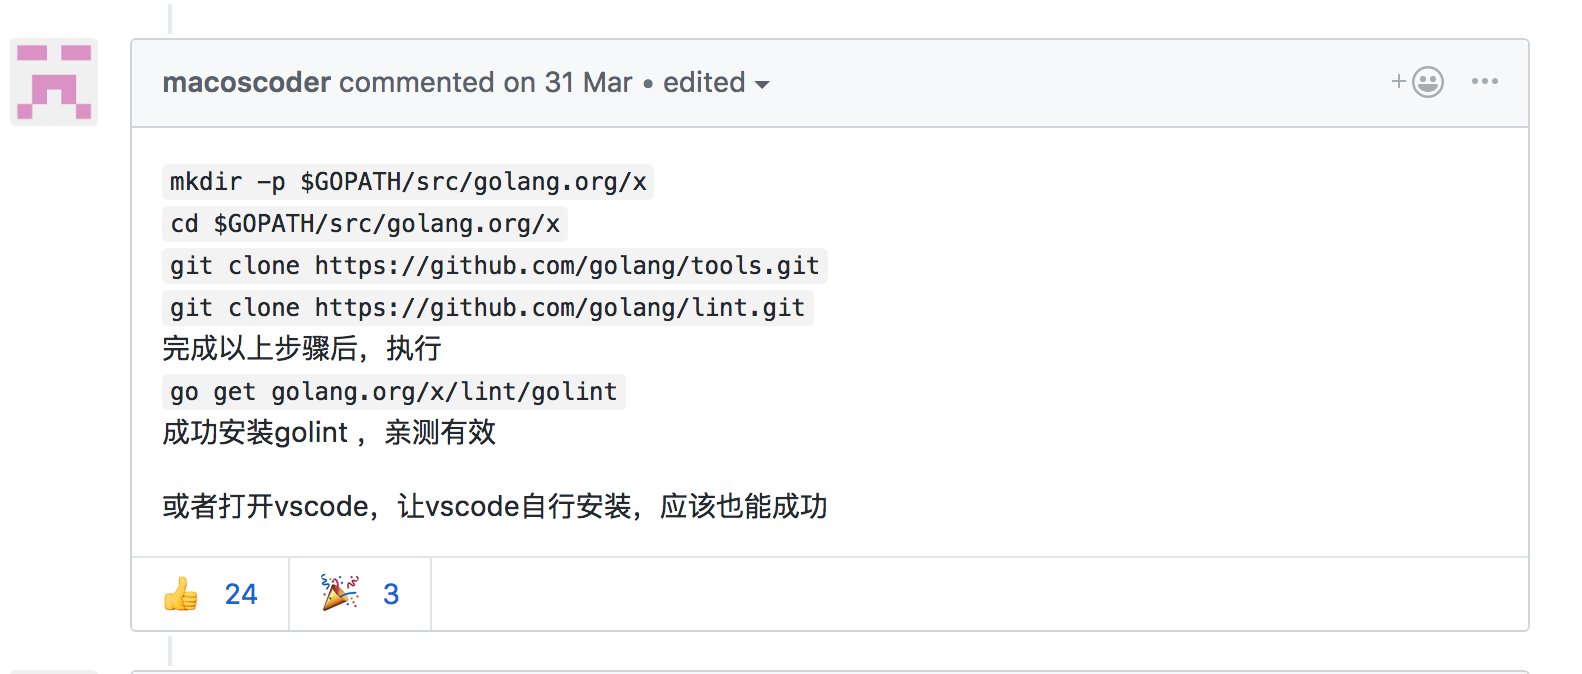
在使用vscode开发go程序的时候,需要安装相关的go插件来提升开发效率。不过总是安装失败,提示包没找到等错误。即使我用了shadowsocks也是一样,通过Google一番,有两种解决方案。
这是安装插件时候的报错信息
    go get -u -t -v github.com/golang/lint/golint
github.com/golang/lint (download)
Fetching https://golang.org/x/tools/go/gcexportdata?go-get=1
https fetch failed: Get https://golang.org/x/tools/go/gcexportdata?go-get=1: dial tcp 172.217.10.241:443: connectex: A connection attempt failed because the connected party did not properly respond after a period of time, or established connection failed because connected host has failed to respond.
package golang.org/x/tools/go/gcexportdata: unrecognized import path "golang.org/x/tools/go/gcexportdata" (https fetch: Get https://golang.org/x/tools/go/gcexportdata?go-get=1: dial tcp 172.217.10.241:443: connectex: A connection attempt failed because the connected party did not properly respond after a period of time, or established connection failed because connected host has failed to respond.)
第一种就是使用其他软件将shadowsocks代理转换为http代理。
第二种就是在github上手动下载相关的包,然后编译安装。
我用了第一种,因为比较懒,不想以后安装其他插件的时候也要一个个手动。
下面说下解决步骤:
brew install polipo 安装polipo, 一种将其他代理转换为http代理的程序
编辑polipo的配置文件 /etc/polipo/config
socksParentProxy = "127.0.0.1:1080"
socksProxyType = socks5
proxyAddress = "::0"
proxyPort  = 8123
启动polipo服务 polipo -c /etc/polipo/config
设置终端临时代理, 可能需要在vscode的终端设置.
 export http_proxy="http://127.0.0.1:8123"
 export https_proxy="http://127.0.0.1:8123"
curl --proxy http://127.0.0.1:8123 https://www.google.com, 如果成功输出内容就可以开始安装VSCode插件了以上只是我的解决方案,下面是一些下该方案和其他方案的链接
第二种是需要手动下载包的, 可做参考
第三种,终端直接设置第三方代理工具,goproxy.io提供了很好的解决方案,具体请参考https://goproxy.io/zh/
| 标题 | 网址 |
|---|---|
| go wiki | https://github.com/golang/go/wiki |
| alexedwards.net | https://www.alexedwards.net/blog/organising-database-access |
| effective go | https://golang.org/doc/effective_go.html |
| learn go tutorials | https://stackify.com/learn-go-tutorials/ |
| go proverbs | https://go-proverbs.github.io/ |
| go concurrency patterns | https://blog.golang.org/pipelines |
| gobyexmaple | https://gobyexample.com/ |
| golangbot | https://golangbot.com/learn-golang-series/ |
| great golang blog | http://blog.golang.org/2011/01/go-slices-usage-and-internals.html |
| yourbasic | https://yourbasic.org/golang/#strings |
| appliedgo | https://appliedgo.net/ |
| 鸟窝 | https://colobu.com/2017/12/28/top-golang-articles-of-2017/ |
| golangprograms | http://www.golangprograms.com/go-language.html |
| tutorialedge.net | https://tutorialedge.net/golang/golang-mysql-tutorial/ |
| 实现RPC的几种方式 | http://idoubi.cc/2017/12/03/golang实现RPC的几种方式/ |
| golanglibs | https://golanglibs.com/ |
| codementor | https://www.codementor.io/community/topic/go |
server.go
package main

import (
    "net/http"
    "log"
    "html/template"
)

func sayHello(w http.ResponseWriter, r *http.Request) {
    t, _ := template.ParseFiles("templates/hello.html")
    t.Execute(w, "this is template data")
}

func main() {
    http.HandleFunc("/hello", sayHello)
    err := http.ListenAndServe(":9090", nil)
    if err != nil {
        log.Fatal("ListenAndServe: ", err)
    }
}
hello.html
<h1>Hello, Gopher!</h1>

<h3>{{.}}</h3>
Custom struct field tags in Golang
https://dave.cheney.net/resources-for-new-go-programmers
https://golang.org/doc/effective_go.html
https://golangbot.com/learn-golang-series/
https://blog.feedspot.com/golang_blogs/
https://go101.org/article/101.html
https://www.sohamkamani.com/blog